CSS Basics & Selectors
Reviewed & published by Brayan K
Learn how CSS works, master selectors, and understand the cascade.
Part of the free HTML & CSS course at LearnCodingFast — hands-on lessons with examples you run in your browser, plus practice exercises and a quick quiz.
What You'll Learn
- ✓ What CSS is and how it works
- ✓ Where CSS lives (inline, internal, external)
- ✓ Element, class, and ID selectors
- ✓ Combining selectors for precision
- ✓ Cascade and specificity rules
- ✓ Essential CSS properties (color, spacing, layout)
What Is CSS and Why It Matters
CSS stands for Cascading Style Sheets.
CSS is the difference between a website people trust and a website people instantly leave. HTML alone creates content. CSS controls perception.
Humans judge a website in under 1 second. That judgment is driven almost entirely by CSS.
- Bad CSS = low trust
- Good CSS = credibility, conversions, money
How CSS Actually Works
CSS works by applying rules to HTML elements.
- A selector (what to target)
- A block of styles (what to apply)
<!DOCTYPE html>
<html>
<head>
  <title>CSS Syntax</title>
  <style>
    /* CSS Rule Structure:
       selector {
         property: value;
       }
    */

    body {
      background-color: #0f172a;
      font-family: system-ui, sans-serif;
      padding: 20px;
    }

    /* Element selector - targets all <p> tags */
    p {
      color: #e5e7eb;
      font-size: 16px;
      line-height: 1.6;
    }

    /* This targets the h1 element */
    h1 {
      color: #3b82f6;
      font-size: 2rem;
    }
  </style>
</head>
<body>
  <h1>CSS Rules in Action</h1>
  <p>This paragraph is styled by the CSS rule above.</p>
  <p>Every paragraph gets the same styles!</p>
  <!-- ✅ Expected result, measured in a real browser:
     p -> color: rgb(229, 231, 235)
     h1 -> color: rgb(59, 130, 246)
  -->
</body>
</html>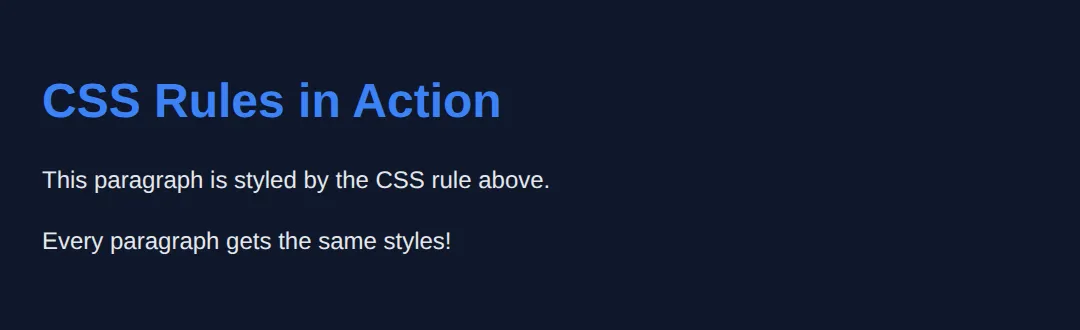
Where CSS Lives (External Files)
Real websites use external CSS files. Always.
- Clean separation of structure and style
- Easier maintenance
- Faster loading (cached by browser)
- Industry standard
Inline CSS is amateur. Internal CSS is temporary. External CSS is professional.
<!DOCTYPE html>
<html>
<head>
<title>CSS Methods</title>
<!-- INTERNAL CSS (in style tag) -->
<style>
body {
background-color: #0f172a;
font-family: system-ui, sans-serif;
padding: 20px;
color: #e5e7eb;
}
.internal-style {
color: #22c55e;
font-weight: bold;
padding: 10px;
background: #1e293b;
border-radius: 8px;
margin: 10px 0;
}
.best-practice {
background: linear-gradient(135deg, #3b82f6, #8b5cf6);
color: white;
padding: 15px;
border-radius: 8px;
margin: 10px 0;
}
</style>
</head>
<body>
<h1>Three Ways to Apply CSS</h1>
<!-- INLINE CSS (in style attribute) - NOT recommended -->
<p style="color: #ef4444; font-style: italic;">
1. Inline CSS - Hard to maintain, avoid this!
</p>
<!-- Internal CSS - OK for demos -->
<p class="internal-style">
2. Internal CSS - In the <style> tag, good for learning
</p>
<!-- External CSS is best -->
<div class="best-practice">
<strong>3. External CSS (Best Practice)</strong><br>
In real projects, use: <link rel="stylesheet" href="styles.css">
</div>
<!-- ✅ Expected result, measured in a real browser:
.internal-style -> padding-top: 10px
.best-practice -> padding-top: 15px
-->
</body>
</html>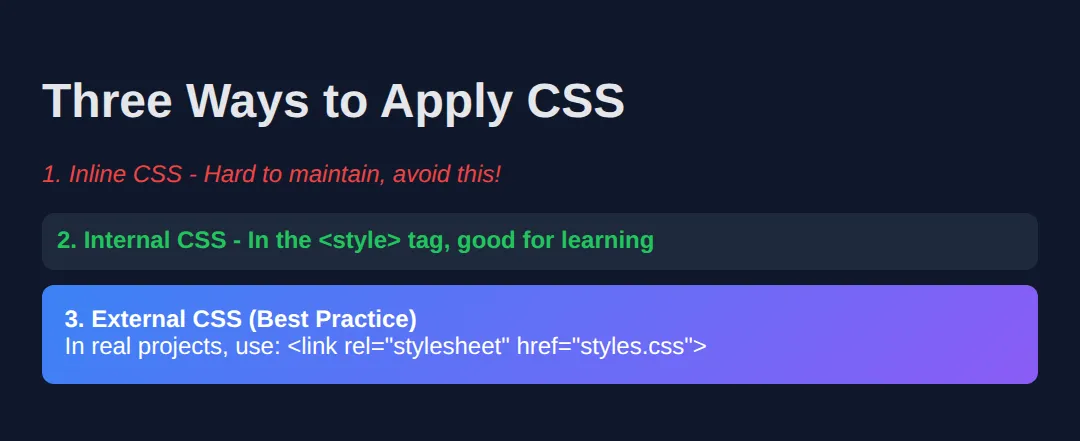
1. Element Selectors (The Basics)
Targets every element of a given type.
Use cases: Global text styling, headings, defaults
⚠️ Overusing element selectors causes problems later. They are broad, not precise.
<!DOCTYPE html>
<html>
<head>
  <title>Element Selectors</title>
  <style>
    /* Element selectors target ALL elements of that type */

    body {
      background-color: #0f172a;
      font-family: system-ui, sans-serif;
      padding: 20px;
    }

    h1 {
      color: #3b82f6;
      font-size: 2.5rem;
      border-bottom: 3px solid #3b82f6;
      padding-bottom: 10px;
    }

    h2 {
      color: #22c55e;
      font-size: 1.5rem;
    }

    p {
      color: #e5e7eb;
      line-height: 1.6;
      margin: 15px 0;
    }

    /* All links get this style */
    a {
      color: #f59e0b;
      text-decoration: none;
    }

    a:hover {
      text-decoration: underline;
    }
  </style>
</head>
<body>
  <h1>Element Selectors Demo</h1>
  <p>Every paragraph on this page has the same style.</p>
  <p>This is because we targeted the 'p' element.</p>

  <h2>Links Example</h2>
  <p>Check out <a href="#">this link</a> and <a href="#">this one too</a>!</p>
  <!-- ✅ Expected result, measured in a real browser:
     a -> text-decoration-line: none
     h1 -> color: rgb(59, 130, 246)
  -->
</body>
</html>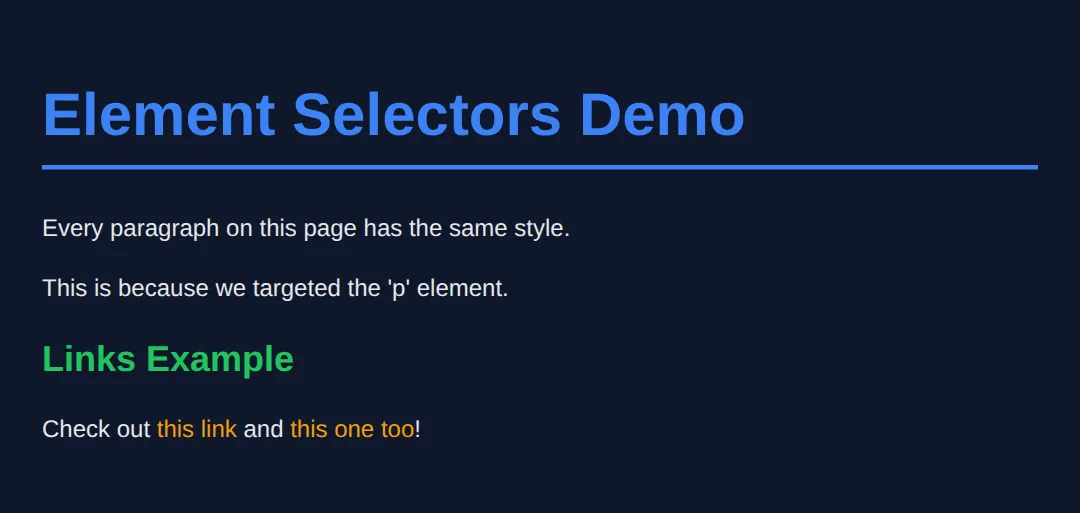
2. Class Selectors (The Most Important)
Classes are reusable. They are the backbone of real CSS.
Why classes are critical:
- Can be reused hundreds of times
- Easy to reason about
- Flexible and safe
90% of your CSS should target classes. If you don't use classes properly, your CSS will collapse.
<!DOCTYPE html>
<html>
<head>
  <title>Class Selectors</title>
  <style>
    body {
      background-color: #0f172a;
      font-family: system-ui, sans-serif;
      padding: 20px;
      color: #e5e7eb;
    }

    /* Class selector - starts with a dot */
    .card {
      background-color: #1e293b;
      padding: 20px;
      border-radius: 12px;
      margin: 15px 0;
      border: 1px solid #334155;
    }

    .highlight {
      color: #22c55e;
      font-weight: 600;
    }

    .text-blue {
      color: #3b82f6;
    }

    .text-center {
      text-align: center;
    }

    /* Multiple classes can be combined */
    .btn {
      padding: 10px 20px;
      border: none;
      border-radius: 8px;
      cursor: pointer;
      font-weight: 600;
    }

    .btn-primary {
      background: #3b82f6;
      color: white;
    }

    .btn-success {
      background: #22c55e;
      color: white;
    }
  </style>
</head>
<body>
  <h1 class="text-blue text-center">Class Selectors</h1>

  <div class="card">
    <p>This is a <span class="highlight">reusable card</span> component.</p>
  </div>

  <div class="card">
    <p>Same class, <span class="highlight">same style</span>!</p>
  </div>

  <div class="card text-center">
    <button class="btn btn-primary">Primary Button</button>
    <button class="btn btn-success">Success Button</button>
  </div>
  <!-- ✅ Expected result, measured in a real browser:
     .btn -> cursor: pointer
     .card -> padding-top: 20px
     .card -> count: 3
  -->
</body>
</html>
📋 CSS Selector Quick Reference
| Selector | Syntax | Specificity | Use Case |
|---|---|---|---|
| Element | p {} | Low (0,0,1) | Global defaults |
| Class | .card {} | Medium (0,1,0) | Reusable components |
| ID | #header {} | High (1,0,0) | Unique sections |
| Inline | style="" | Highest | Avoid if possible! |
💡 Pro tip: Use classes for 90% of your CSS. They're reusable and easy to maintain.
3. ID Selectors (Use Carefully)
IDs are unique. There should only be one per page.
- One ID per element
- One element per ID
- Never reuse IDs
⚠️ IDs are strong but dangerous if abused. Most modern CSS avoids them except for layout anchors.
<!DOCTYPE html>
<html>
<head>
  <title>ID Selectors</title>
  <style>
    body {
      background-color: #0f172a;
      font-family: system-ui, sans-serif;
      margin: 0;
      color: #e5e7eb;
    }

    /* ID selector - starts with a hash # */
    #header {
      background: linear-gradient(135deg, #1e293b, #334155);
      padding: 30px;
      text-align: center;
      border-bottom: 3px solid #3b82f6;
    }

    #main-content {
      max-width: 800px;
      margin: 0 auto;
      padding: 30px;
    }

    #footer {
      background: #1e293b;
      padding: 20px;
      text-align: center;
      color: #64748b;
      position: fixed;
      bottom: 0;
      width: 100%;
    }

    /* IDs have higher specificity than classes */
    .title {
      color: #ef4444; /* This won't work on #header h1 */
    }

    #header h1 {
      color: #3b82f6; /* This wins due to ID specificity */
      margin: 0;
    }
  </style>
</head>
<body>
  <header id="header">
    <h1 class="title">Website Header</h1>
    <p>IDs are unique - only one #header per page!</p>
  </header>

  <main id="main-content">
    <h2>Main Content Area</h2>
    <p>This section has id="main-content" for styling.</p>
    <p>Use IDs for major page sections, not for styling components.</p>
  </main>

  <footer id="footer">
    <p>Footer with id="footer"</p>
  </footer>
  <!-- ✅ Expected result, measured in a real browser:
     #footer -> position: fixed
     #header -> padding-top: 30px
  -->
</body>
</html>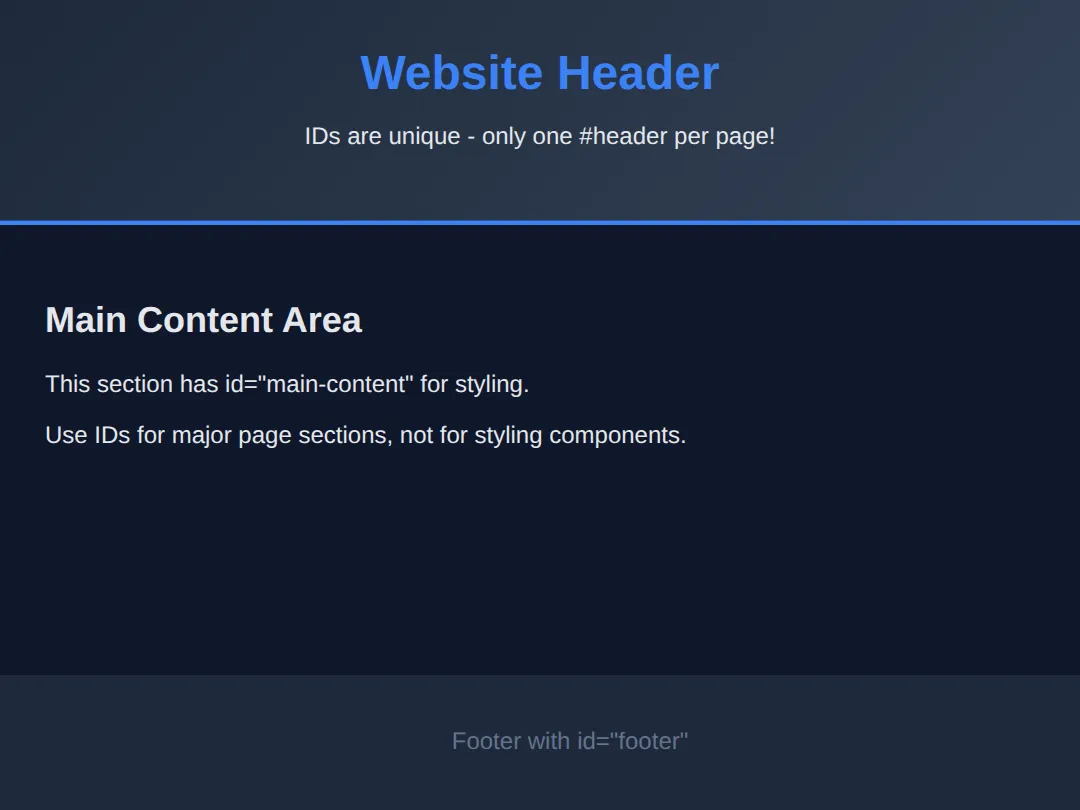
Combining Selectors (Precision Control)
You can target elements inside other elements.
Scope your styles or you will regret it later.
<!DOCTYPE html>
<html>
<head>
  <title>Combining Selectors</title>
  <style>
    body {
      background-color: #0f172a;
      font-family: system-ui, sans-serif;
      padding: 20px;
      color: #e5e7eb;
    }

    /* Descendant selector: space between selectors */
    .card p {
      color: #94a3b8;
      font-size: 14px;
    }

    /* Only links inside nav */
    .nav a {
      color: #3b82f6;
      text-decoration: none;
      margin-right: 20px;
    }

    .nav a:hover {
      color: #60a5fa;
      text-decoration: underline;
    }

    /* Direct child selector: > */
    .list > li {
      color: #22c55e;
      padding: 5px 0;
    }

    .card {
      background: #1e293b;
      padding: 20px;
      border-radius: 12px;
      margin: 15px 0;
    }

    .card h3 {
      color: #f59e0b;
      margin-top: 0;
    }

    /* Multiple selectors - same styles */
    h1, h2, h3 {
      font-family: Georgia, serif;
    }
  </style>
</head>
<body>
  <h1>Combining Selectors</h1>

  <nav class="nav">
    <a href="#">Home</a>
    <a href="#">About</a>
    <a href="#">Contact</a>
  </nav>

  <div class="card">
    <h3>Card Title</h3>
    <p>This paragraph is inside .card, so it gets special styling.</p>
    <p>Only paragraphs inside cards are affected!</p>
  </div>

  <p>This paragraph is NOT inside a card - different style!</p>

  <ul class="list">
    <li>Direct child of .list</li>
    <li>Also a direct child</li>
    <li>Green because of > selector</li>
  </ul>
  <!-- ✅ Expected result, measured in a real browser:
     .nav a -> text-decoration-line: none
     .card p -> color: rgb(148, 163, 184)
  -->
</body>
</html>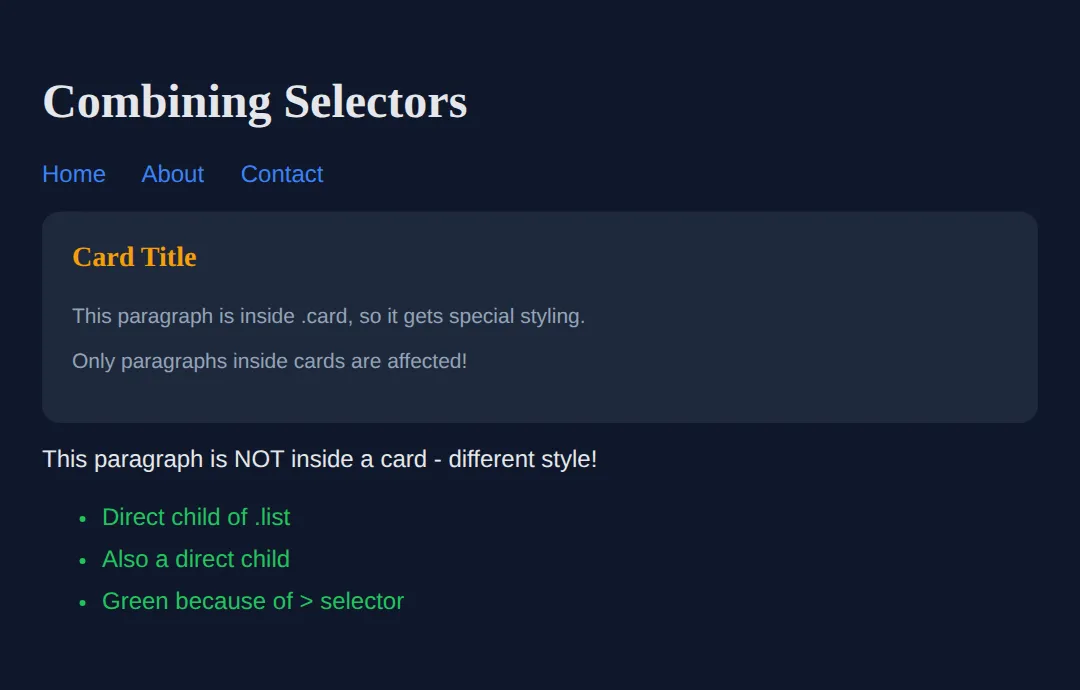
CSS Properties You MUST Know
Color & Text: Fonts and spacing affect readability and trust.
Spacing (Box Model): Every element is a box with padding, margin, and border.
💡 If your layout feels "off", it's usually padding or margin.
<!DOCTYPE html>
<html>
<head>
  <title>Essential CSS Properties</title>
  <style>
    body {
      background-color: #0f172a;
      font-family: system-ui, sans-serif;
      padding: 20px;
      color: #e5e7eb;
    }

    /* Text properties */
    .text-demo {
      color: #3b82f6;
      font-size: 18px;
      font-weight: 600;
      line-height: 1.6;
      text-align: center;
      letter-spacing: 0.5px;
    }

    /* Background properties */
    .bg-demo {
      background-color: #1e293b;
      background: linear-gradient(135deg, #1e293b, #334155);
      padding: 20px;
      border-radius: 12px;
      margin: 20px 0;
    }

    /* Box model properties */
    .box-demo {
      padding: 20px;        /* Inside space */
      margin: 20px 0;       /* Outside space */
      border: 2px solid #3b82f6;
      border-radius: 8px;
      background: #1e293b;
    }

    /* Layout centering */
    .container {
      max-width: 600px;
      margin: 0 auto;
      padding: 20px;
    }

    /* Sizing */
    .sized-box {
      width: 100%;
      max-width: 400px;
      height: 100px;
      background: #22c55e;
      display: flex;
      align-items: center;
      justify-content: center;
      border-radius: 8px;
      color: #0f172a;
      font-weight: bold;
    }
  </style>
</head>
<body>
  <div class="container">
    <h1>Essential CSS Properties</h1>

    <div class="bg-demo">
      <p class="text-demo">Text Styling Demo</p>
      <p>Font size, weight, color, and alignment.</p>
    </div>

    <div class="box-demo">
      <h3>Box Model Demo</h3>
      <p>This box has padding, margin, and border.</p>
    </div>

    <div class="sized-box">
      Sized & Centered Box
    </div>
  </div>
  <!-- ✅ Expected result, measured in a real browser:
     .sized-box -> display: flex
     .text-demo -> color: rgb(59, 130, 246)
  -->
</body>
</html>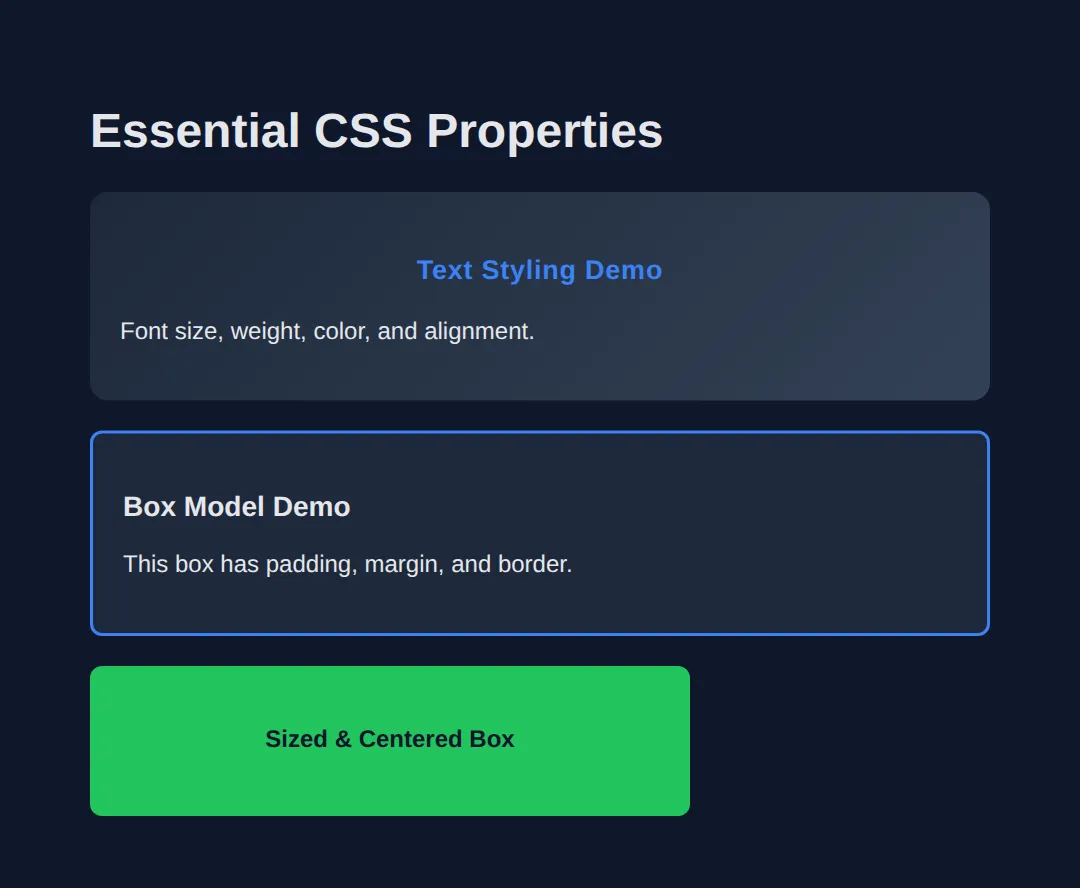
Understanding Cascade & Specificity
CSS stands for Cascading Style Sheets. This means:
- Later rules override earlier ones
- More specific selectors win
- Inline styles override everything
Understanding cascade prevents "Why isn't my CSS working?" moments.
<!DOCTYPE html>
<html>
<head>
  <title>Cascade & Specificity</title>
  <style>
    body {
      background-color: #0f172a;
      font-family: system-ui, sans-serif;
      padding: 20px;
      color: #e5e7eb;
    }

    .demo-box {
      background: #1e293b;
      padding: 15px;
      margin: 15px 0;
      border-radius: 8px;
      border-left: 4px solid;
    }

    /* SPECIFICITY ORDER (low to high):
       1. Element selectors (p, h1, div)
       2. Class selectors (.card, .btn)
       3. ID selectors (#main, #header)
       4. Inline styles (style="...")
    */

    /* Element selector - lowest specificity */
    p {
      color: #ef4444;
      border-color: #ef4444;
    }

    /* Class selector - higher specificity */
    .blue-text {
      color: #3b82f6;
      border-color: #3b82f6;
    }

    /* ID selector - even higher */
    #special {
      color: #22c55e;
      border-color: #22c55e;
    }

    /* Later rules override earlier (same specificity) */
    .override-demo {
      color: #ef4444;
    }
    .override-demo {
      color: #22c55e; /* This wins - it comes later! */
    }
  </style>
</head>
<body>
  <h1>CSS Cascade Demo</h1>

  <div class="demo-box">
    <p>Element selector only - RED</p>
  </div>

  <div class="demo-box">
    <p class="blue-text">Class beats element - BLUE</p>
  </div>

  <div class="demo-box">
    <p class="blue-text" id="special">ID beats class - GREEN</p>
  </div>

  <div class="demo-box">
    <p class="blue-text" style="color: #f59e0b; border-color: #f59e0b;">
      Inline beats everything - ORANGE
    </p>
  </div>

  <div class="demo-box">
    <p class="override-demo">Later rules win (same specificity) - GREEN</p>
  </div>
  <!-- ✅ Expected result, measured in a real browser:
     .demo-box -> padding-top: 15px
     p -> color: rgb(239, 68, 68)
     .demo-box -> count: 5
  -->
</body>
</html>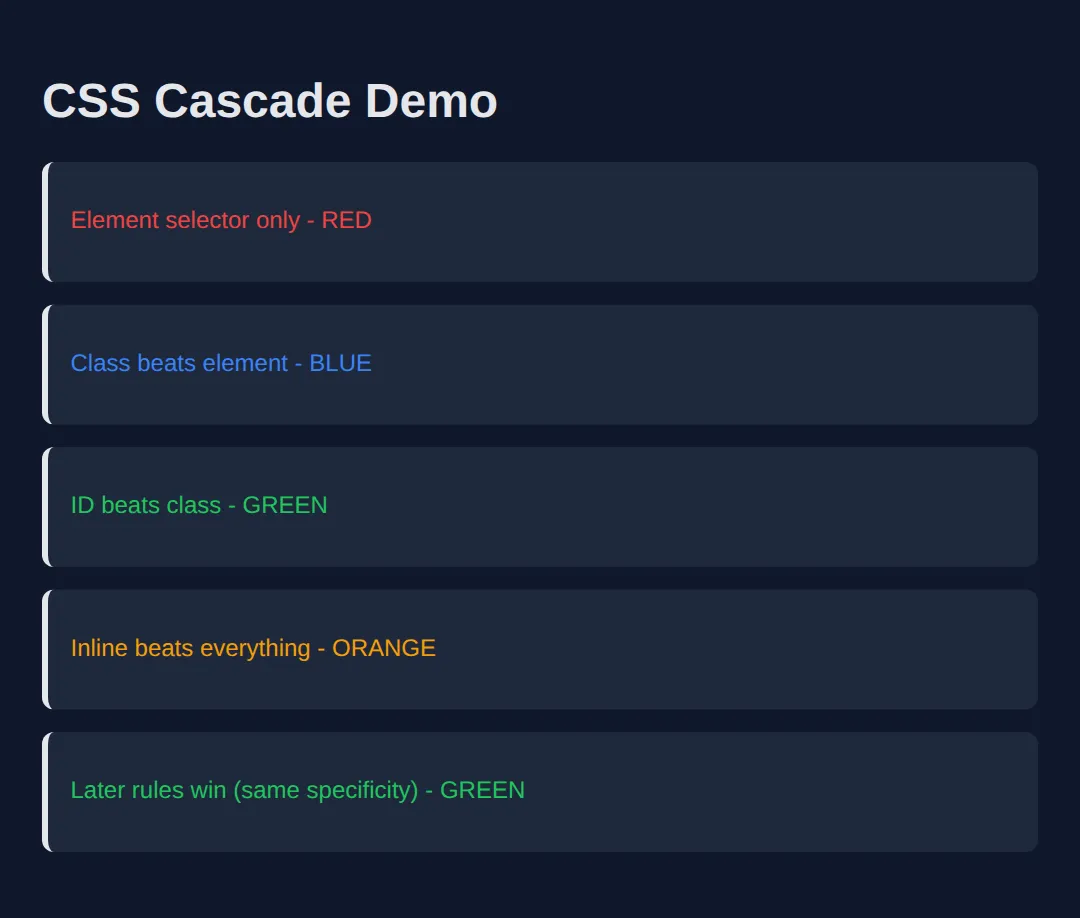
🧠 Worked Example — one small stylesheet, read line by line
You have met each selector type on its own. This is what a real stylesheet looks like when they are all working together on the same page: three note boxes, one set of rules, and a comment on every rule saying exactly which elements it grabs and what it changes. Read it before you run it and try to predict the three coloured bars.
<!DOCTYPE html>
<html lang="en">
<head>
<meta charset="UTF-8">
<title>Worked Example: one stylesheet, five selectors</title>
<style>
  /* ELEMENT SELECTOR: matches the <body> tag itself.
     Colours and fonts set here are INHERITED by everything inside, which is why
     you never have to set font-family on each paragraph. */
  body { background:#0f172a; color:#e5e7eb; font-family: system-ui, sans-serif; padding:24px; line-height:1.5; }

  /* CLASS SELECTOR (a full stop, then the name): matches every element whose
     class attribute contains "note" — all three boxes below.
     Specificity 0-1-0. */
  .note {
    background:#1e293b;
    border-left:5px solid #64748b;   /* the grey bar down the left edge */
    border-radius:8px;
    padding:14px 16px;               /* 14px top and bottom, 16px left and right */
    margin-bottom:14px;              /* the gap BETWEEN the boxes */
  }

  /* GROUPED SELECTOR (a comma): one rule, two targets. Identical to writing the
     same declarations out twice, and impossible to let them drift apart. */
  h2, h3 { color:#60a5fa; margin-bottom:6px; }

  /* DESCENDANT SELECTOR (a space): a <p> ANYWHERE inside an element with
     class="note". A <p> outside the boxes is not touched. Specificity 0-1-1. */
  .note p { color:#94a3b8; font-size:.9rem; }

  /* Same specificity as .note (both 0-1-0), but written LATER in the file, so on
     the boxes that carry both classes this border colour wins. Note it only
     overrides border-LEFT-COLOR — the 5px and the "solid" from .note survive. */
  .important { border-left-color:#f59e0b; }
  .important p { color:#fbbf24; }

  /* ID SELECTOR (a hash): matches the one element with id="urgent".
     Specificity 1-0-0, which outranks any number of classes, so this beats
     .important even though .important is written above it. */
  #urgent { border-left-color:#ef4444; }
  #urgent p { color:#fca5a5; }
</style>
</head>
<body>
  <div class="note">
    <h2>Plain note</h2>
    <p>Body text.</p>
  </div>

  <div class="note important">
    <h3>Important note</h3>
    <p>Body text.</p>
  </div>

  <div class="note important" id="urgent">
    <h3>Urgent note</h3>
    <p>Body text.</p>
  </div>

  <!-- ✅ What you should see: three dark rounded boxes, each with a 5px coloured
       bar down its left edge.
         Box 1 — GREY bar, grey body text. Only .note applied.
         Box 2 — AMBER bar, amber body text. .important came later than .note.
         Box 3 — RED bar, pink body text. #urgent is an id, so it beats the class
                 even though the class rule is written after it in the file.
       All three headings are the same blue, because the grouped h2, h3 rule
       covers both — the h2 is just bigger, which is the browser's own default.
       Try this: move the .important rule BELOW the #urgent rule and re-run.
       Box 3 stays red. Source order only breaks ties between rules of EQUAL
       specificity, and an id is never equal to a class. -->
  <!-- ✅ Expected result, measured in a real browser:
     .note -> padding-top: 14px
     .note p -> color: rgb(148, 163, 184)
     .note -> count: 3
  -->
</body></html>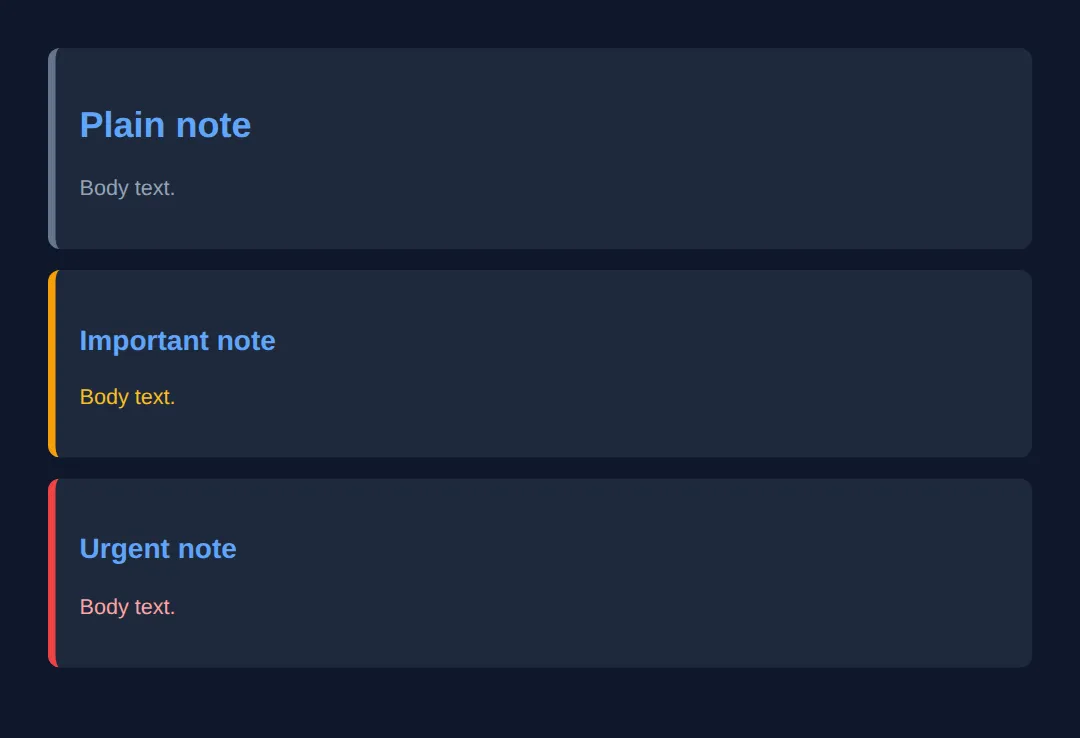
🎯 Your Turn — write the four selectors
The declarations are all written for you. What is missing is the hard part: the four selectors that decide who gets them. Fill in the blanks marked ___ — remember a class starts with ., an id starts with #, an element is just its name, and a space between two selectors means "inside".
<!DOCTYPE html>
<html lang="en">
<head>
<meta charset="UTF-8">
<title>Your Turn: Selectors</title>
<style>
  /* 🎯 YOUR TURN — fill in the four blanks marked ___ (they are all selectors) */

  body { background:#0f172a; color:#e5e7eb; font-family:system-ui,sans-serif; padding:24px; }
  h2 { color:#60a5fa; font-size:1.1rem; margin-bottom:12px; }

  /* 1) Every paragraph on the page, wherever it is. */
  ___ { color:#94a3b8; }
  /* 👉 replace ___ with  p  */

  /* 2) Only the boxes — the elements with class="card". */
  ___ { background:#1e293b; border-left:5px solid #64748b; border-radius:8px; padding:14px 16px; margin-bottom:12px; }
  /* 👉 replace ___ with  .card  */

  /* 3) Only the single element with id="hero". */
  ___ { border-left-color:#22c55e; }
  /* 👉 replace ___ with  #hero  */

  /* 4) Only the paragraphs that are INSIDE a card — the one at the top of the
        page must keep its normal size. */
  ___ { font-size:.85rem; }
  /* 👉 replace ___ with  .card p  */
</style>
</head>
<body>
  <h2>Notices</h2>
  <p>This paragraph is outside any card.</p>

  <div class="card" id="hero">
    <p>First card.</p>
  </div>

  <div class="card">
    <p>Second card.</p>
  </div>

  <!-- ✅ Expected once all four blanks are filled:
       - All three paragraphs are the same grey.
       - The two cards are dark rounded boxes with 5px bars down their left edge.
         The first card's bar is GREEN (the id rule); the second card's is grey.
       - The paragraph at the top is noticeably larger than the two inside the
         cards (16px versus 13.6px). If all three are the same size, blank 4 is
         still matching every p instead of only the ones inside a card. -->
</body></html>
Common Beginner CSS Mistakes
- ❌ Styling everything with element selectors
- ❌ No class naming strategy
- ❌ Random colors with no consistency
- ❌ No spacing consistency
- ❌ Inline styles everywhere
- ❌ Copy-pasting without understanding
CSS is simple. Bad CSS habits are what make it hard.
Practice Challenge
Build a page with:
- A card component with proper classes
- A centered layout using max-width and margin
- A dark theme with consistent colors
- Clean typography with proper spacing
<!DOCTYPE html>
<html lang="en">
<head>
  <meta charset="UTF-8">
  <title>CSS Practice</title>
  <style>
    * {
      box-sizing: border-box;
      margin: 0;
      padding: 0;
    }

    body {
      background: linear-gradient(180deg, #0f172a, #1e293b);
      color: #e5e7eb;
      font-family: system-ui, sans-serif;
      min-height: 100vh;
    }

    .container {
      max-width: 800px;
      margin: 0 auto;
      padding: 40px 20px;
    }

    .header {
      text-align: center;
      margin-bottom: 40px;
    }

    .header h1 {
      color: #3b82f6;
      font-size: 2.5rem;
      margin-bottom: 10px;
    }

    .header p {
      color: #94a3b8;
    }

    .card {
      background: #1e293b;
      padding: 24px;
      border-radius: 12px;
      margin-bottom: 20px;
      border: 1px solid #334155;
      transition: transform 0.2s, box-shadow 0.2s;
    }

    .card:hover {
      transform: translateY(-2px);
      box-shadow: 0 10px 30px rgba(0, 0, 0, 0.3);
    }

    .card h2 {
      color: #22c55e;
      margin-bottom: 12px;
    }

    .card p {
      color: #94a3b8;
      line-height: 1.6;
    }

    .btn {
      display: inline-block;
      background: #3b82f6;
      color: white;
      padding: 12px 24px;
      border-radius: 8px;
      text-decoration: none;
      font-weight: 600;
      margin-top: 15px;
      transition: background 0.2s;
    }

    .btn:hover {
      background: #2563eb;
    }
  </style>
</head>
<body>
  <div class="container">
    <header class="header">
      <h1>My Styled Page</h1>
      <p>Built with CSS classes and proper selectors</p>
    </header>

    <div class="card">
      <h2>Card Component</h2>
      <p>This card uses the .card class for styling. Hover over it to see the transition effect!</p>
      <a href="#" class="btn">See CSS Card Demo</a>
    </div>

    <div class="card">
      <h2>Reusable Styles</h2>
      <p>The same class creates consistent styling across multiple elements. This is the power of CSS classes!</p>
      <a href="#" class="btn">Get Started</a>
    </div>
  </div>
  <!-- ✅ Expected result, measured in a real browser:
     .btn -> display: inline-block
     .container -> max-width: 800px
     .card -> count: 2
  -->
</body>
</html>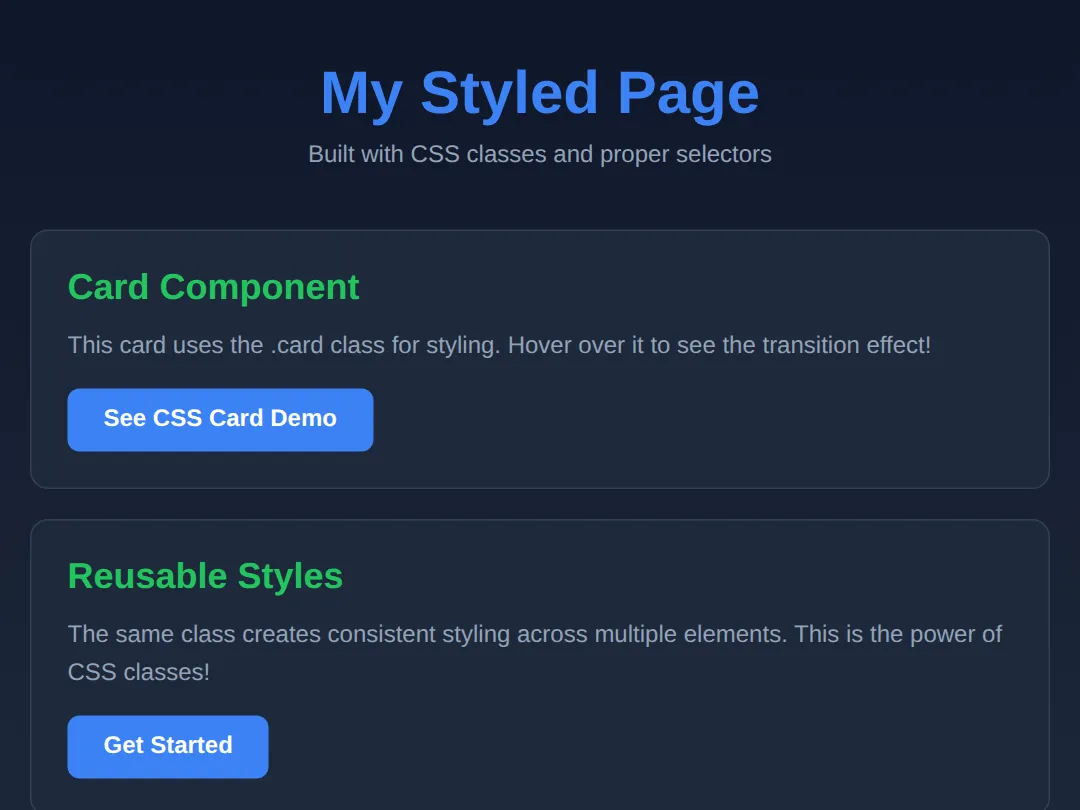
🧩 Mini-Challenge — style a business card
Last rung of the ladder: the HTML is written, the stylesheet is empty, and there are no blanks to fill — just a brief. Everything it asks for is something you have already seen in this lesson. Work down the list one rule at a time and re-run after each one; that is how professionals write CSS too.
Key Takeaways
- ✓ CSS controls perception and user trust
- ✓ Selectors decide which elements get styled
- ✓ Classes are king - use them for 90% of your CSS
- ✓ Specificity determines which styles win conflicts
- ✓ External CSS files are the professional standard
Practice quiz
What does CSS stand for?
- Computer Style Sheets
- Creative Styling System
- Cascading Style Sheets
- Coded Style Syntax
Answer: Cascading Style Sheets. CSS stands for Cascading Style Sheets — 'cascading' refers to how conflicting rules are resolved.
What are the two parts of every CSS rule?
- A selector and a block of styles (declarations)
- A tag and an id
- A property and a comment
- An element and an attribute
Answer: A selector and a block of styles (declarations). Each rule has a selector (what to target) and a declaration block (the property: value pairs to apply).
Which character begins a class selector?
- A hash (#)
- An at-sign (@)
- An ampersand (&)
- A dot (.)
Answer: A dot (.). Class selectors start with a dot, like .card. ID selectors start with a hash, like #header.
Which character begins an ID selector?
- A dot (.)
- A hash (#)
- A colon (:)
- An asterisk (*)
Answer: A hash (#). ID selectors start with a hash, like #header. An ID should be unique — only one per page.
How many elements should share a given ID on a page?
- Exactly one — IDs are unique
- As many as you like
- At most three
- Only block elements
Answer: Exactly one — IDs are unique. An ID is unique: one ID per element and one element per ID. Never reuse IDs.
Order these selectors from lowest to highest specificity.
- Class, element, ID
- ID, class, element
- Element, class, ID
- Element, ID, class
Answer: Element, class, ID. Specificity rises from element (0,0,1) to class (0,1,0) to ID (1,0,0). Inline styles beat all of them.
When two rules have the SAME specificity, which one wins?
- The first one written
- The one that comes later in the stylesheet
- The shorter one
- Neither — both are ignored
Answer: The one that comes later in the stylesheet. With equal specificity, the later rule wins — that is the 'cascade' in Cascading Style Sheets.
Which way of applying CSS overrides element, class and ID selectors (short of !important)?
- External stylesheet
- Internal style tag
- A class selector
- Inline style attribute
Answer: Inline style attribute. Inline styles (style="...") have the highest specificity of the normal sources and override element, class and ID rules.
Which method does the lesson recommend for real websites?
- Inline CSS on every element
- External CSS files linked with link rel="stylesheet"
- Internal CSS in a style tag
- No CSS at all
Answer: External CSS files linked with link rel="stylesheet". External CSS files are the professional standard: clean separation, easier maintenance, and browser caching.
What does the descendant selector '.card p' (with a space) target?
- Every p on the page
- Only direct child p of .card
- Only p elements inside an element with class card
- The p directly after .card
Answer: Only p elements inside an element with class card. A space is the descendant combinator: .card p matches all p elements inside any .card, at any depth.
Continue this course
- Previous: HTML Elements & Attributes
- Next: CSS Styling & Colors — Control fonts, colours, backgrounds, and borders to make pages look great
- Quick reference: HTML & CSS cheat sheet › CSS Selectors · CSS Selectors cheat sheet › Basic Selectors